Redis集群
# Redis集群
本章是基于CentOS7下的Redis集群教程,包括:
- 单机安装Redis
- Redis主从
- Redis分片集群
# 1.单机安装Redis
首先需要安装Redis所需要的依赖:
yum install -y gcc tcl
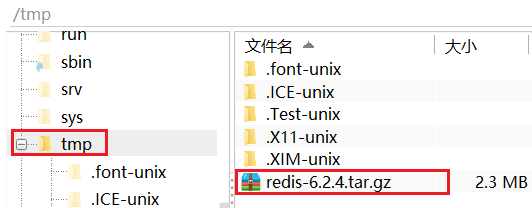
然后将课前资料提供的Redis安装包上传到虚拟机的任意目录:
例如,我放到了/tmp目录:
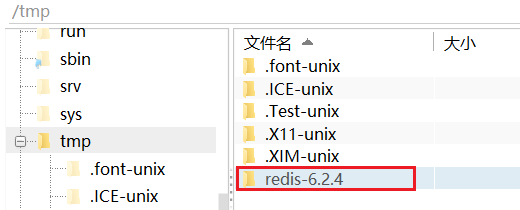
解压缩:
tar -xzf redis-6.2.4.tar.gz
解压后:
进入redis目录:
cd redis-6.2.4
运行编译命令:
make && make install
如果没有出错,应该就安装成功了。
然后修改redis.conf文件中的一些配置:
# 绑定地址,默认是127.0.0.1,会导致只能在本地访问。修改为0.0.0.0则可以在任意IP访问
bind 0.0.0.0
# 保护模式,关闭保护模式
protected-mode no
# 数据库数量,设置为1
databases 1
启动Redis:
redis-server redis.conf
停止redis服务:
redis-cli shutdown
# 2.Redis主从集群
# 2.1.集群结构
我们搭建的主从集群结构如图:
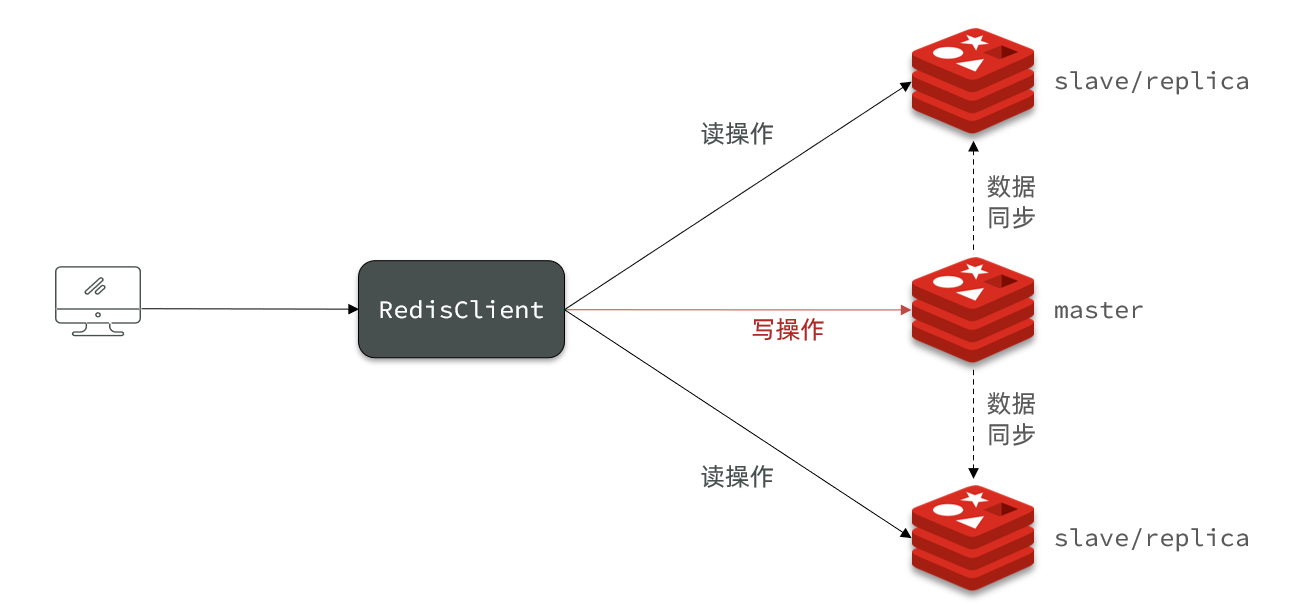
共包含三个节点,一个主节点,两个从节点。
这里我们会在同一台虚拟机中开启3个redis实例,模拟主从集群,信息如下:
| IP | PORT | 角色 |
|---|---|---|
| 192.168.150.101 | 7001 | master |
| 192.168.150.101 | 7002 | slave |
| 192.168.150.101 | 7003 | slave |
# 2.2.准备实例和配置
要在同一台虚拟机开启3个实例,必须准备三份不同的配置文件和目录,配置文件所在目录也就是工作目录。
1)创建目录
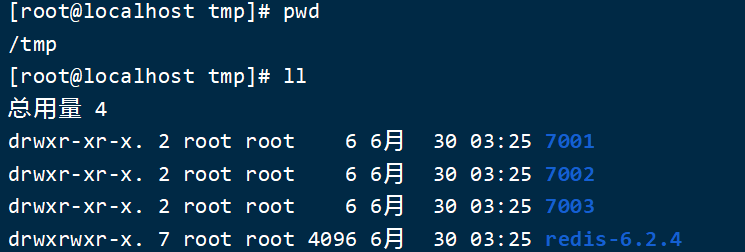
我们创建三个文件夹,名字分别叫7001、7002、7003:
# 进入/tmp目录
cd /tmp
# 创建目录
mkdir 7001 7002 7003
如图:
2)恢复原始配置
修改redis-6.2.4/redis.conf文件,将其中的持久化模式改为默认的RDB模式,AOF保持关闭状态。
# 开启RDB
# save ""
save 3600 1
save 300 100
save 60 10000

# 关闭AOF
appendonly no
3)拷贝配置文件到每个实例目录
然后将redis-6.2.4/redis.conf文件拷贝到三个目录中(在/tmp目录执行下列命令):
# 方式一:逐个拷贝
cp redis-6.2.4/redis.conf 7001
cp redis-6.2.4/redis.conf 7002
cp redis-6.2.4/redis.conf 7003

# 方式二:管道组合命令,一键拷贝
echo 7001 7002 7003 | xargs -t -n 1 cp redis-6.2.4/redis.conf
4)修改每个实例的端口、工作目录
修改每个文件夹内的配置文件,将端口分别修改为7001、7002、7003,将rdb文件保存位置都修改为自己所在目录(在/tmp目录执行下列命令):
sed -i -e 's/6379/7001/g' -e 's/dir .\//dir \/tmp\/7001\//g' 7001/redis.conf
sed -i -e 's/6379/7002/g' -e 's/dir .\//dir \/tmp\/7002\//g' 7002/redis.conf
sed -i -e 's/6379/7003/g' -e 's/dir .\//dir \/tmp\/7003\//g' 7003/redis.conf
5)修改每个实例的声明IP
虚拟机本身有多个IP,为了避免将来混乱,我们需要在redis.conf文件中指定每一个实例的绑定ip信息,格式如下:
# redis实例的声明 IP
replica-announce-ip 192.168.150.101
每个目录都要改,我们一键完成修改(在/tmp目录执行下列命令):1a在第一行后追加
# 逐一执行
sed -i '1a replica-announce-ip 192.168.150.101' 7001/redis.conf
sed -i '1a replica-announce-ip 192.168.150.101' 7002/redis.conf
sed -i '1a replica-announce-ip 192.168.150.101' 7003/redis.conf

# 或者一键修改
printf '%s\n' 7001 7002 7003 | xargs -I{} -t sed -i '1a replica-announce-ip 192.168.150.101' {}/redis.conf
# 2.3.启动
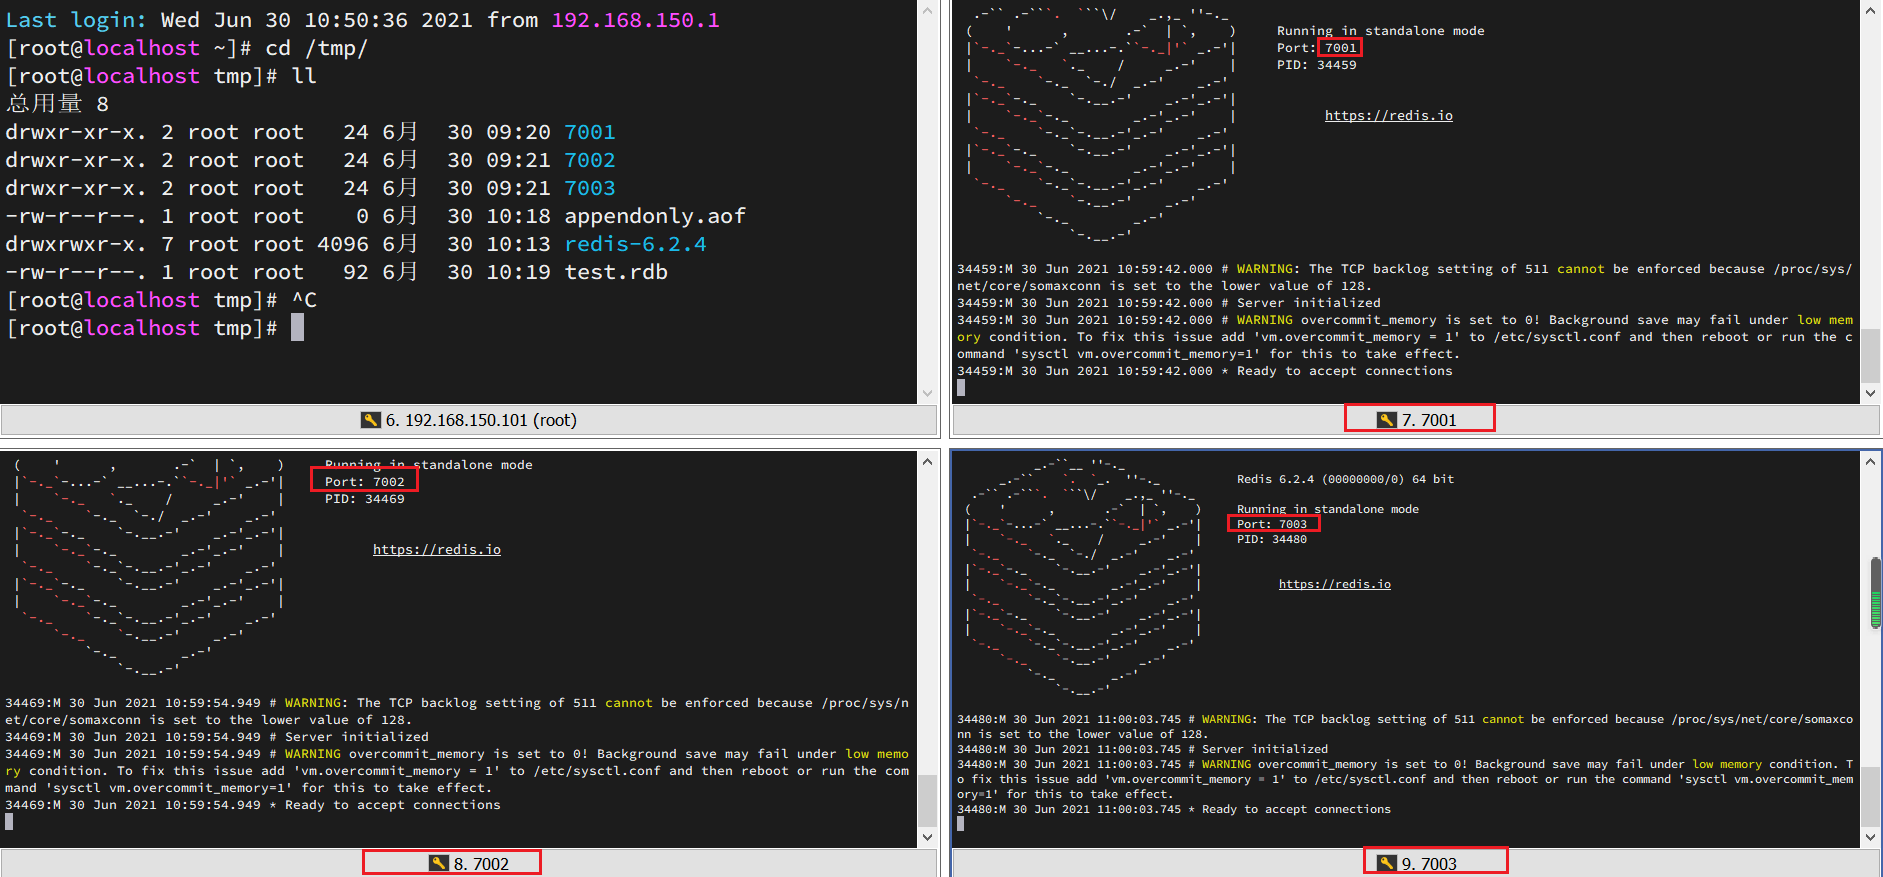
为了方便查看日志,我们打开3个ssh窗口,分别启动3个redis实例,启动命令:
# 第1个
redis-server 7001/redis.conf
# 第2个
redis-server 7002/redis.conf
# 第3个
redis-server 7003/redis.conf
启动后:
如果要一键停止,可以运行下面命令:
printf '%s\n' 7001 7002 7003 | xargs -I{} -t redis-cli -p {} shutdown
# 2.4.开启主从关系
现在三个实例还没有任何关系,要配置主从可以使用replicaof 或者slaveof(5.0以前)命令。
有临时和永久两种模式:
修改配置文件(永久生效)
- 在redis.conf中添加一行配置:
slaveof <masterip> <masterport>
- 在redis.conf中添加一行配置:
使用redis-cli客户端连接到redis服务,执行slaveof命令(重启后失效):
slaveof <masterip> <masterport>
注意:在5.0以后新增命令replicaof,与salveof效果一致。
这里我们为了演示方便,使用方式二。
通过redis-cli命令连接7002,执行下面命令:
# 连接 7002
redis-cli -p 7002
# 执行slaveof
slaveof 192.168.150.101 7001
通过redis-cli命令连接7003,执行下面命令:
# 连接 7003
redis-cli -p 7003
# 执行slaveof
slaveof 192.168.150.101 7001
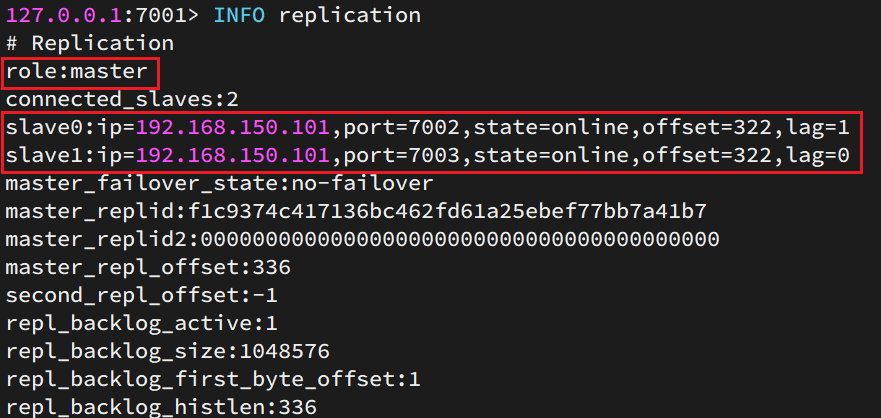
然后连接 7001节点,查看集群状态:
# 连接 7001
redis-cli -p 7001
# 查看状态
info replication
注意:这里的节点不能有密码,不然会设置失败**
如果需要,在从节点设置连接主节点使用的密码
# 指定主节点的 IP 地址和端口
slaveof your_master_ip your_master_port

# 设置连接主节点所需的密码
masterauth your_master_password

# 如果你希望从节点也受到密码保护,可以设置 requirepass
requirepass your_slave_password
结果:
# 2.5.测试
执行下列操作以测试:
利用redis-cli连接7001,执行
set num 123利用redis-cli连接7002,执行
get num,再执行set num 666利用redis-cli连接7003,执行
get num,再执行set num 888
可以发现,只有在7001这个master节点上可以执行写操作,7002和7003这两个slave节点只能执行读操作。
# 3.搭建哨兵集群
# 3.1.集群结构
这里我们搭建一个三节点形成的Sentinel集群,来监管之前的Redis主从集群。如图:
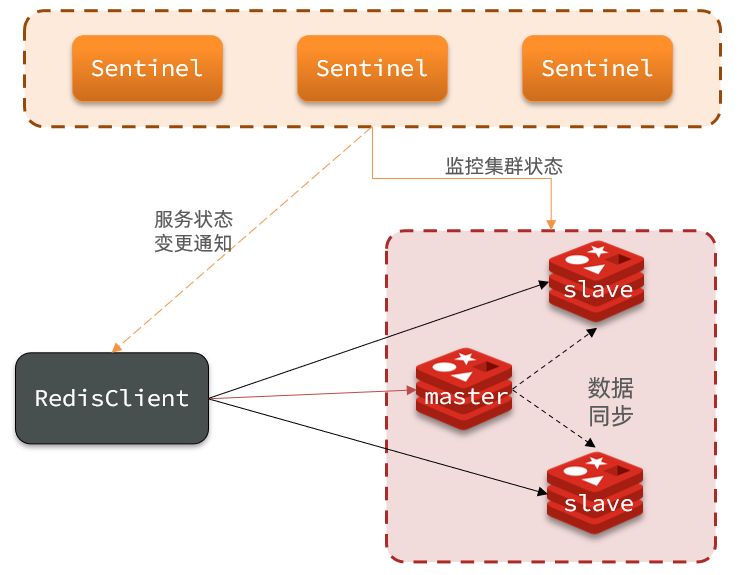
三个sentinel实例信息如下:
| 节点 | IP | PORT |
|---|---|---|
| s1 | 192.168.150.101 | 27001 |
| s2 | 192.168.150.101 | 27002 |
| s3 | 192.168.150.101 | 27003 |
# 3.2.准备实例和配置
要在同一台虚拟机开启3个实例,必须准备三份不同的配置文件和目录,配置文件所在目录也就是工作目录。
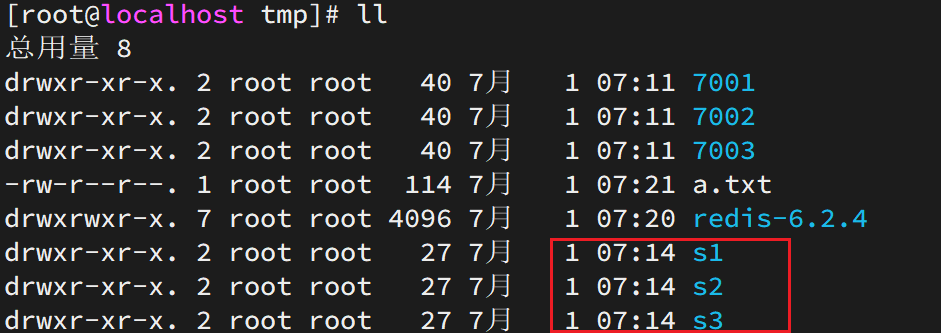
我们创建三个文件夹,名字分别叫s1、s2、s3:
# 进入/tmp目录
cd /tmp
# 创建目录
mkdir s1 s2 s3
如图:
然后我们在s1目录创建一个sentinel.conf文件,添加下面的内容:
port 27001
sentinel announce-ip 192.168.150.101
sentinel monitor mymaster 192.168.150.101 7001 2
sentinel down-after-milliseconds mymaster 5000
sentinel failover-timeout mymaster 60000
dir "/tmp/s1"
解读:
port 27001:是当前sentinel实例的端口sentinel monitor mymaster 192.168.150.101 7001 2:指定主节点信息mymaster:主节点名称,自定义,任意写192.168.150.101 7001:主节点的ip和端口2:选举master时的quorum值
然后将s1/sentinel.conf文件拷贝到s2、s3两个目录中(在/tmp目录执行下列命令):
# 方式一:逐个拷贝
cp s1/sentinel.conf s2
cp s1/sentinel.conf s3
# 方式二:管道组合命令,一键拷贝
echo s2 s3 | xargs -t -n 1 cp s1/sentinel.conf
修改s2、s3两个文件夹内的配置文件,将端口分别修改为27002、27003:
sed -i -e 's/27001/27002/g' -e 's/s1/s2/g' s2/sentinel.conf
sed -i -e 's/27001/27003/g' -e 's/s1/s3/g' s3/sentinel.conf
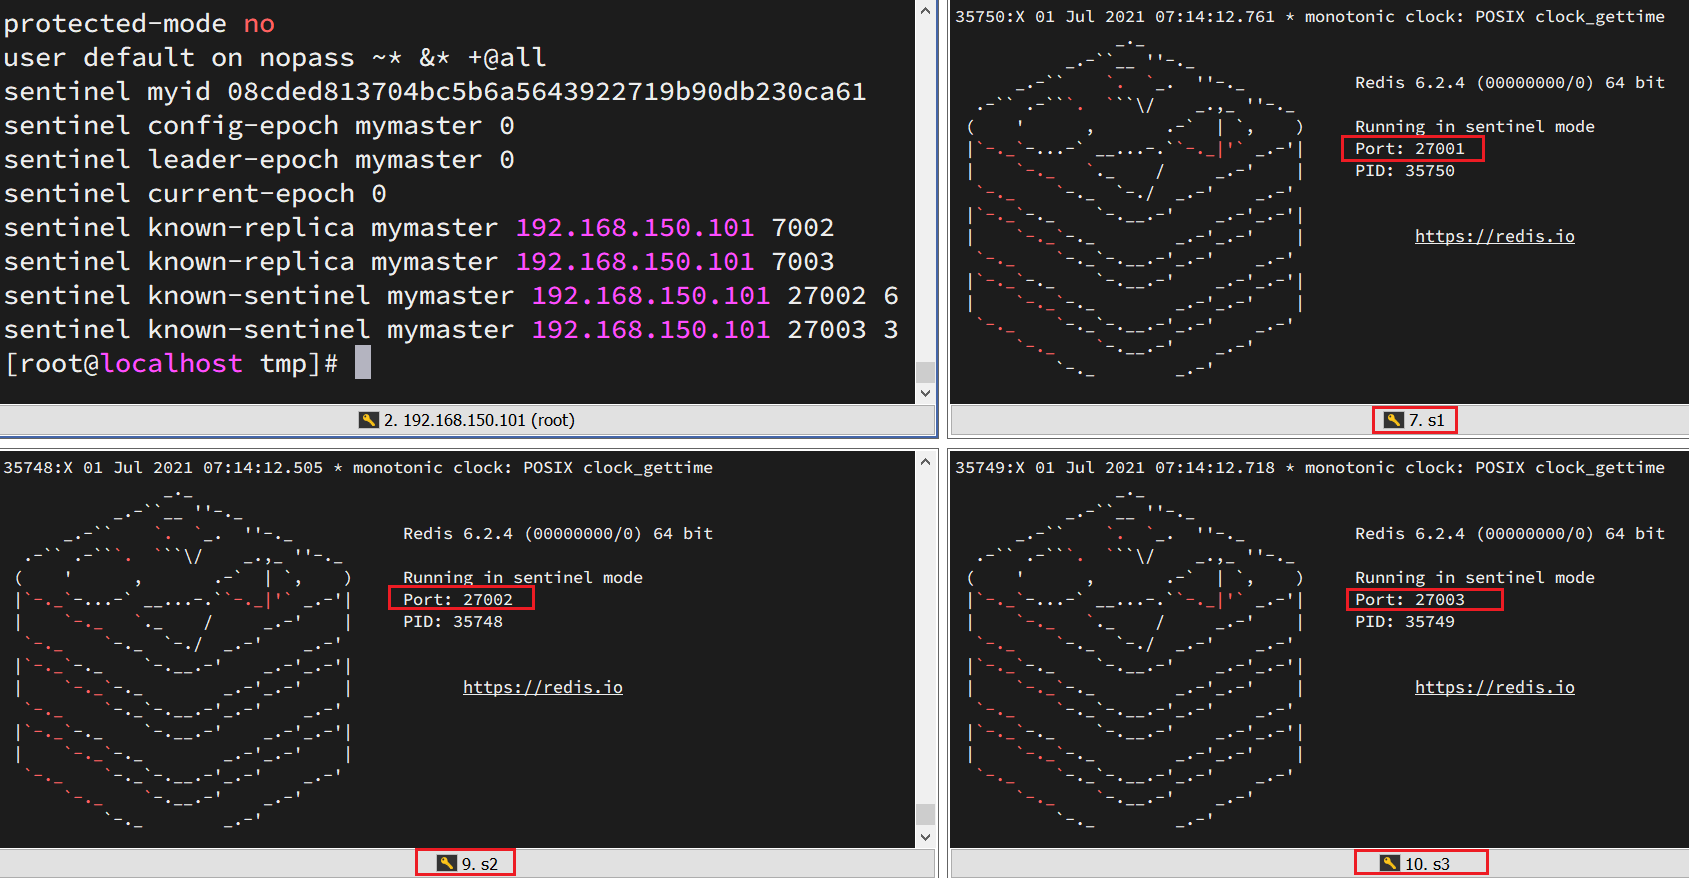
# 3.3.启动
为了方便查看日志,我们打开3个ssh窗口,分别启动3个redis实例,启动命令:
# 第1个
redis-sentinel s1/sentinel.conf
# 第2个
redis-sentinel s2/sentinel.conf
# 第3个
redis-sentinel s3/sentinel.conf
启动后:
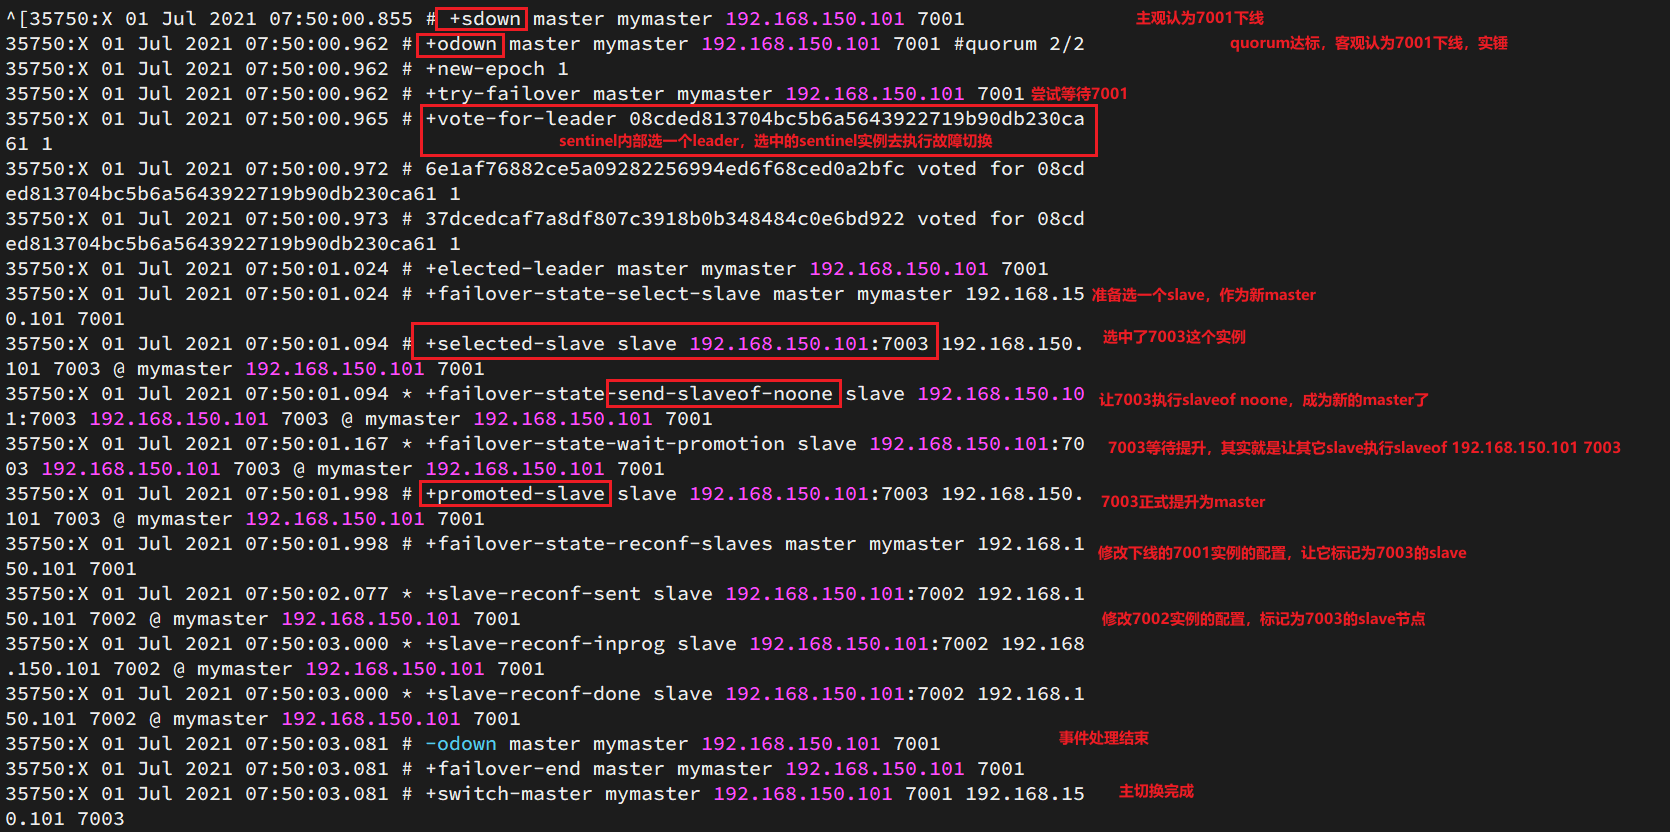
# 3.4.测试
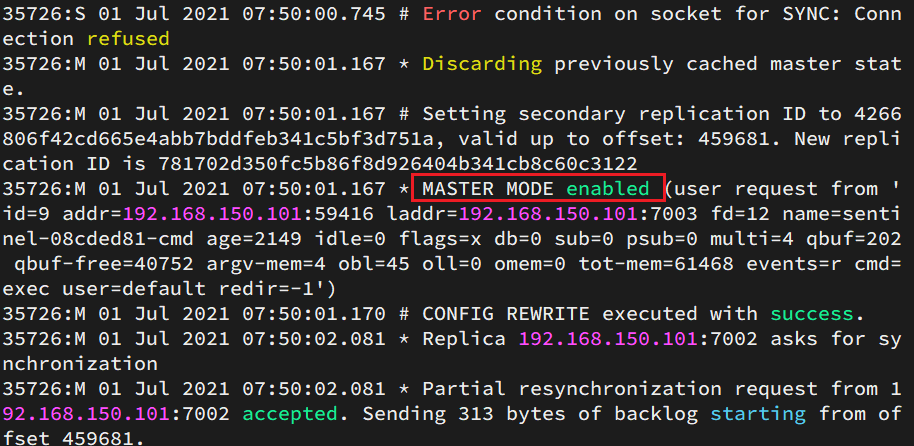
尝试让master节点7001宕机,查看sentinel日志:
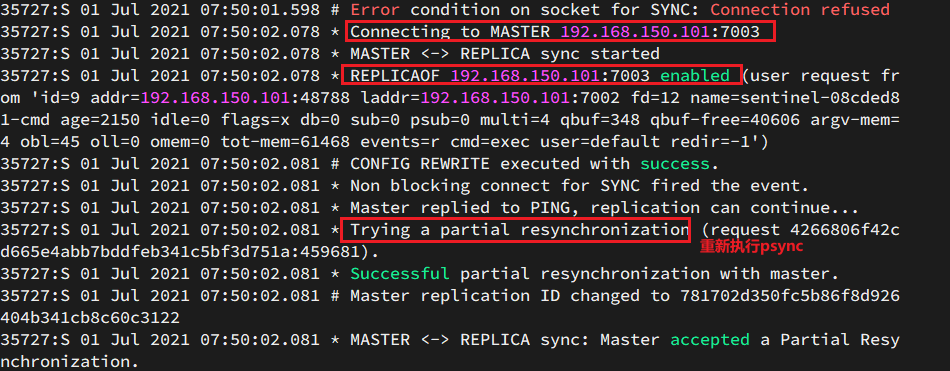
查看7003的日志:
查看7002的日志:
# 4.搭建分片集群
# 4.1.集群结构
分片集群需要的节点数量较多,这里我们搭建一个最小的分片集群,包含3个master节点,每个master包含一个slave节点,结构如下:
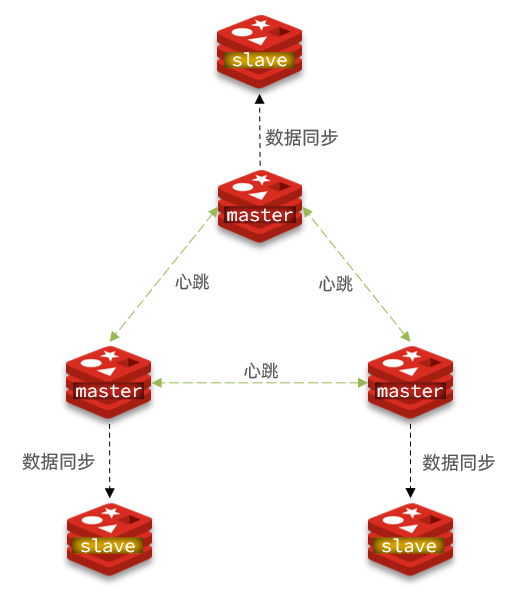
这里我们会在同一台虚拟机中开启6个redis实例,模拟分片集群,信息如下:
| IP | PORT | 角色 |
|---|---|---|
| 192.168.150.101 | 7001 | master |
| 192.168.150.101 | 7002 | master |
| 192.168.150.101 | 7003 | master |
| 192.168.150.101 | 8001 | slave |
| 192.168.150.101 | 8002 | slave |
| 192.168.150.101 | 8003 | slave |
# 4.2.准备实例和配置
删除之前的7001、7002、7003这几个目录,重新创建出7001、7002、7003、8001、8002、8003目录:
# 进入/tmp目录
cd /tmp
# 删除旧的,避免配置干扰
rm -rf 7001 7002 7003
# 创建目录
mkdir 7001 7002 7003 8001 8002 8003
在/tmp下准备一个新的redis.conf文件,内容如下:
port 6379
# 开启集群功能
cluster-enabled yes
# 集群的配置文件名称,不需要我们创建,由redis自己维护
cluster-config-file /tmp/6379/nodes.conf
# 节点心跳失败的超时时间
cluster-node-timeout 5000
# 持久化文件存放目录
dir /tmp/6379
# 绑定地址
bind 0.0.0.0
# 让redis后台运行
daemonize yes
# 注册的实例ip
replica-announce-ip 192.168.150.101
# 保护模式
protected-mode no
# 数据库数量
databases 1
# 日志
logfile /tmp/6379/run.log
将这个文件拷贝到每个目录下:
# 进入/tmp目录
cd /tmp
# 执行拷贝
echo 7001 7002 7003 8001 8002 8003 | xargs -t -n 1 cp redis.conf
修改每个目录下的redis.conf,将其中的6379修改为与所在目录一致:
# 进入/tmp目录
cd /tmp
# 修改配置文件
printf '%s\n' 7001 7002 7003 8001 8002 8003 | xargs -I{} -t sed -i 's/6379/{}/g' {}/redis.conf
# 4.3.启动⭐
因为已经配置了后台启动模式,所以可以直接启动服务:
# 进入/tmp目录
cd /tmp
# 一键启动所有服务
printf '%s\n' 7001 7002 7003 8001 8002 8003 | xargs -I{} -t redis-server {}/redis.conf
通过ps查看状态:
ps -ef | grep redis
发现服务都已经正常启动:

如果要关闭所有进程,可以执行命令:
ps -ef | grep redis | awk '{print $2}' | xargs kill
或者(推荐这种方式):
printf '%s\n' 7001 7002 7003 8001 8002 8003 | xargs -I{} -t redis-cli -p {} shutdown
或者使用脚本
vim redis=cluster-stop.sh
#!/bin/bash

REDIS_HOME=/export/server/redis
# Stop Server
## node01
$(REDIS_HOME)/bin/redis-cli -h node1.itcast.cn -p 7001 SHUTDOWN
$(REDIS_HOME)/bin/redis-cli -h node1.itcast.cn -p 7002 SHUTDOWN
## node02
$(REDIS_HOME)/bin/redis-cl1 -h node2.itcast.cn -p 7001 SHUTDOWN
$(REDIS_HOME)/bin/redis-cli -h node2.itcast.cn -p 7002 SHUTDOWN
## node03
$(REDIS_HOME)/bin/redis-cli -h node3.itcast.en -p 7001 SHUTDOWN
$(REDIS_HOME)/bin/redis-cli -h node3.itcast.cn -p 7002 SHUTDONN
# 4.4.创建集群
虽然服务启动了,但是目前每个服务之间都是独立的,没有任何关联。
我们需要执行命令来创建集群,在Redis5.0之前创建集群比较麻烦,5.0之后集群管理命令都集成到了redis-cli中。
1)Redis5.0之前
Redis5.0之前集群命令都是用redis安装包下的src/redis-trib.rb来实现的。因为redis-trib.rb是有ruby语言编写的所以需要安装ruby环境。
# 安装依赖
yum -y install zlib ruby rubygems
gem install redis
然后通过命令来管理集群:
# 进入redis的src目录
cd /tmp/redis-6.2.4/src
# 创建集群
./redis-trib.rb create --replicas 1 192.168.150.101:7001 192.168.150.101:7002 192.168.150.101:7003 192.168.150.101:8001 192.168.150.101:8002 192.168.150.101:8003
2)Redis5.0以后
我们使用的是Redis6.2.4版本,集群管理以及集成到了redis-cli中,格式如下:
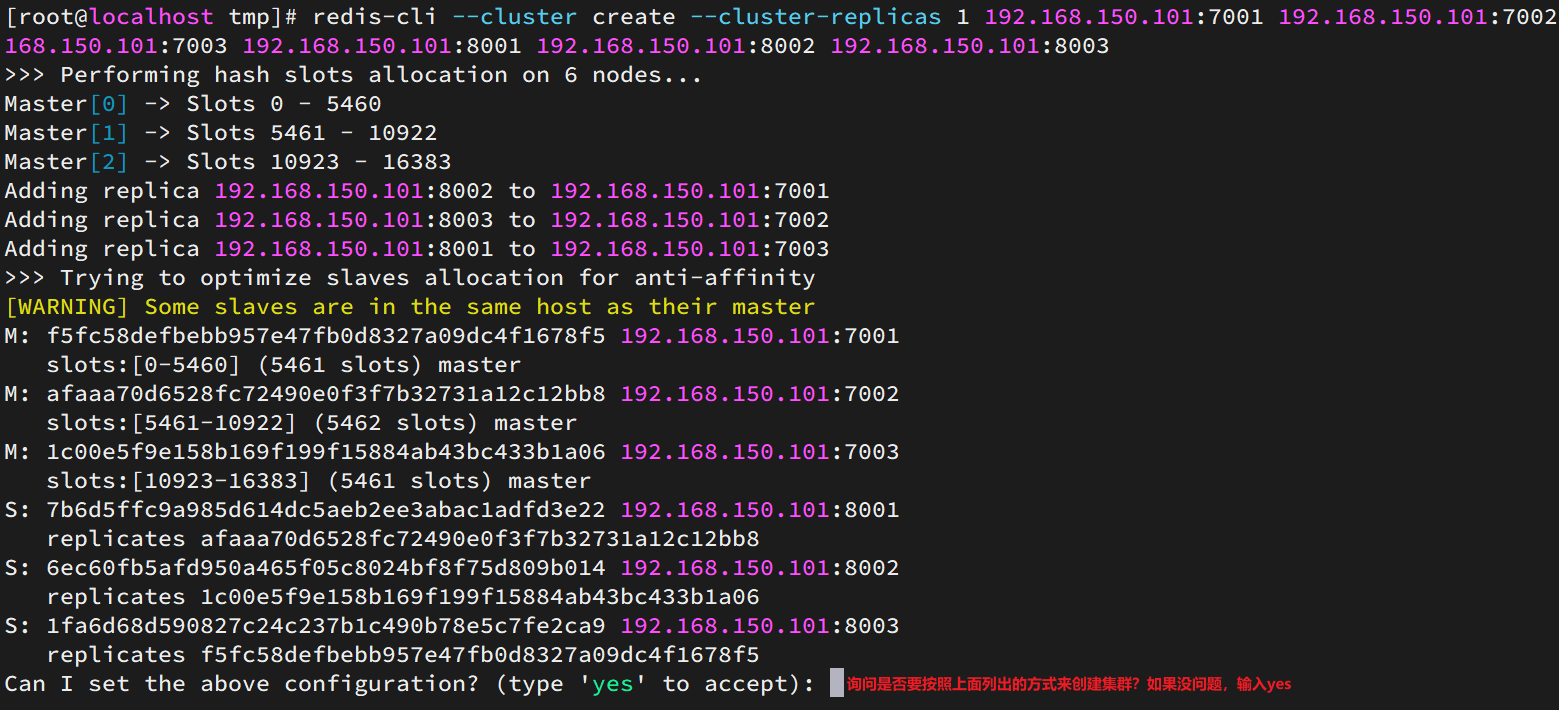
redis-cli --cluster create --cluster-replicas 1 192.168.150.101:7001 192.168.150.101:7002 192.168.150.101:7003 192.168.150.101:8001 192.168.150.101:8002 192.168.150.101:8003
命令说明:
redis-cli --cluster或者./redis-trib.rb:代表集群操作命令create:代表是创建集群--replicas 1或者--cluster-replicas 1:指定集群中每个master的副本个数为1,此时节点总数 ÷ (replicas + 1)得到的就是master的数量。因此节点列表中的前n个就是master,其它节点都是slave节点,随机分配到不同master
运行后的样子:
这里输入yes,则集群开始创建:
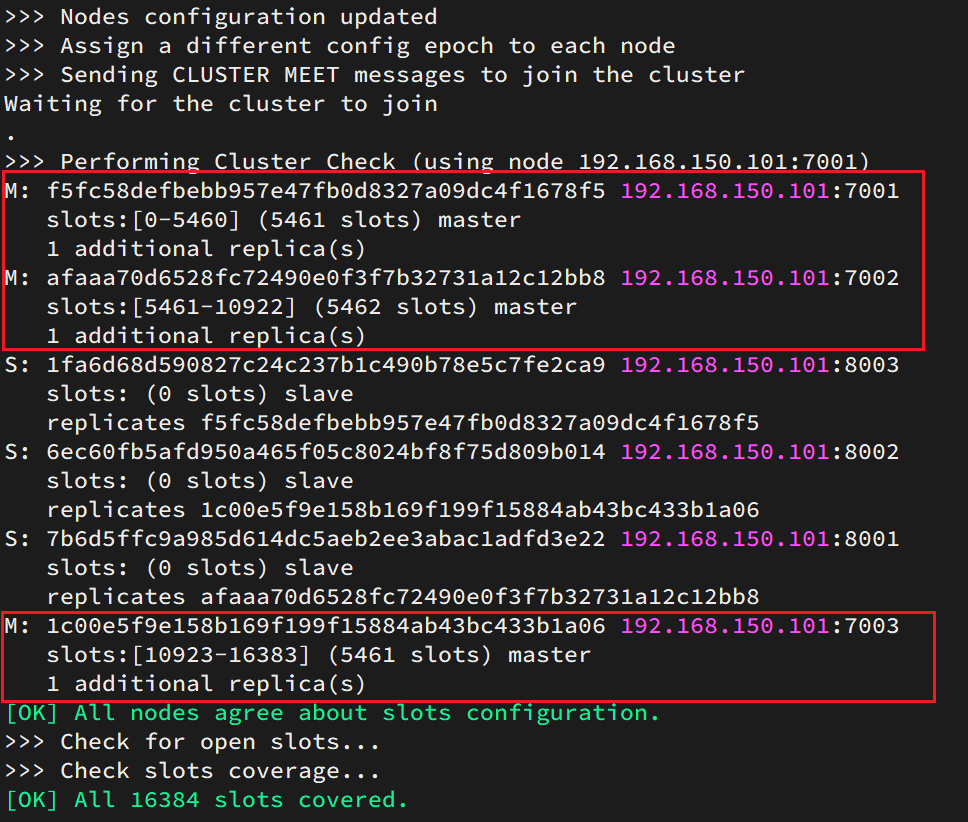
通过命令可以查看集群状态:
redis-cli -p 7001 cluster nodes

# 4.5.测试⭐
尝试连接7001节点,存储一个数据:
# 连接
redis-cli -p 7001
# 存储数据
set num 123
# 读取数据
get num
# 再次存储
set a 1
结果悲剧了:
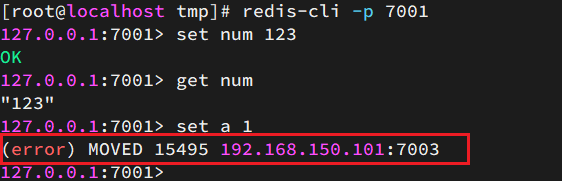
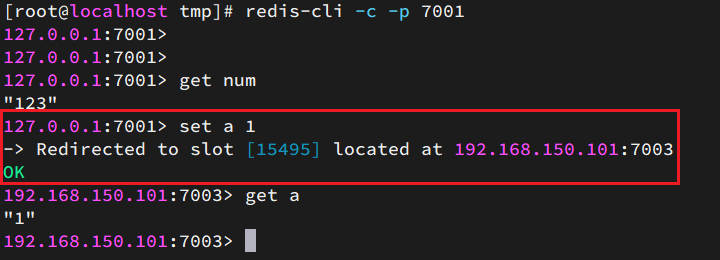
集群操作时,需要给redis-cli加上-c参数才可以:
redis-cli -c -p 7001
这次可以了: